Remember the last time you tried to take a decent photo of your baby? They either looked away, closed their eyes, or decided it was the perfect moment to practice their latest facial expression. Now imagine that photo needs to meet strict government regulations—stressful, right?
That’s where this guide comes in. This guide simplifies the baby passport photo requirements, helping you take a compliant picture without the stress.
US Baby Passport Photo Requirements for Infants: The Official Rules
The U.S. Department of State has specific requirements for passport photos, and infants are no exception. Here’s what you need to know:
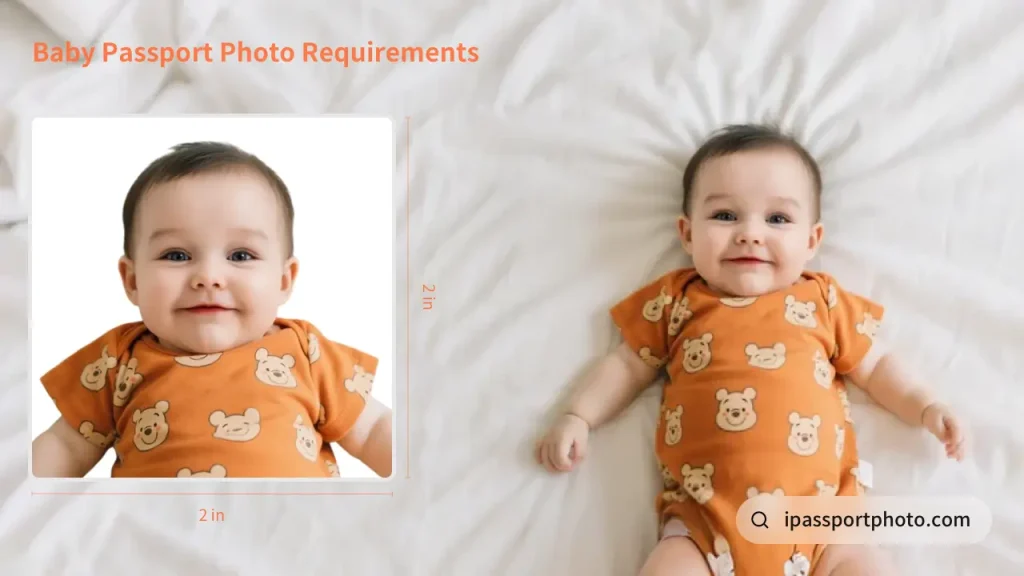
- Photo size and dimensions: The photo must be 2 x 2 inches (51 x 51 mm) square.
- Photo age: Must be taken in the last 6 months.
- Background: Use a plain white or off-white background with no patterns, textures, or shadows.
- Head size and position: Head should be between 1 inch and 1 3/8 inches (25-35 mm) from the bottom of the chin to the top of the head.
- Eyes: Aim for both eyes open, though there’s leniency for newborns if they’re not fully open.
- Expression: Keep a natural, neutral look with the mouth closed—think calm and composed.
- Shadows: No shadows on the face or background.
- Accessories: No hats, headphones, or other accessories, except for religious headwear worn daily.

Following these baby passport photo rules will help your application sail through without hitches.
Common Mistakes to Avoid When Taking a Baby Passport Photo
Taking a baby’s passport photo can be tricky. Knowing the common mistakes will save you time and frustration. Let’s dive into the most frequent issues and simple fixes.
“My Hand is in the Photo!”: How to Support Your Baby without Getting in the Shot
It’s the classic dilemma—your baby can’t sit up on their own, but if you support them, your hand ends up in the picture. Here are solutions:
- The white sheet method: Lay your baby on a plain white sheet on the floor and shoot from above.
- Car seat trick: Place your baby in a car seat covered with a white sheet, then position the camera at eye level.
- Two-person team: Have one person hold the baby from behind the camera (out of frame) while the other takes the photo.
The Perfect Background: Keeping it Plain and White
A cluttered background is one of the top reasons for passport photo rejection. Create a compliant background at home with:
- A large white poster board taped to the wall
- A clean white bedsheet hung behind your baby
- A plain white wall with good lighting
Avoid using beds with patterned sheets or walls with textured paint, as these can create shadows or patterns that violate the requirements.
Framing is Key: Getting Your Baby’s Face to be the Star of the Photo
The size of your baby’s head in the photo matters more than you might think. To get it right:
- Zoom in so that the head takes up about 50-69% of the frame
- Position the camera at eye level with your baby (get on the floor if necessary)
- Use a passport photo template app to check dimensions before finalizing
Most photo editing apps offer passport photo templates that can help you crop correctly.
The Great Ear Debate: Do Both Ears Need to be Visible?
Many parents fret over whether their baby’s ears must show in the photo, but relax—it’s not a hard rule for infants. The official guidelines focus on the full face being visible and facing forward. As long as nothing obscures the face, like hair or accessories, you’re good to go. Ears peeking out is a bonus, not a must.
Eyes Wide Open (or Not?): The Truth About Your Baby’s Gaze
The official requirement states eyes must be open, but newborns and young infants often keep their eyes closed. Here’s what you need to know:
- For babies under 1 month old: Some leniency is typically shown
- For older infants: Try taking photos after a nap when they’re well-rested
- Use a colorful toy just above the camera to capture their attention
- Take dozens of photos—you only need one good one!
DIY Baby Passport Photos: A Step-by-Step Guide
Why head to a studio when you can handle a baby passport photo at home? With some prep, it’s easier than you think. Follow these steps for success:
- Gather your supplies: Grab a good camera or smartphone, use a white sheet for the background, and find a spot with plenty of natural light. Remember to turn off the flash!
- Prepare your baby: Make sure they’re fed, changed, and in a happy mood to minimize fussing.
- Set up the background and lighting: Lay down the white sheet on the floor or cover a car seat. Position near a window for soft, even light without shadows.
- Position your baby and take the photos: Place your infant facing the camera, support gently if needed (out of frame), and snap multiple shots from directly above or at eye level.
- Review and select the best photo: Check against the requirements using a template, then print on photo paper or upload for processing.
This DIY approach keeps things simple and cost-effective for your baby passport photo needs.
Will My Baby’s Passport Photo Be Rejected?
The good news is that passport officials are generally more lenient with infant photos than adult ones. Common issues like slightly open mouths or partially closed eyes are often accepted. If your photo is rejected:
- You’ll receive a notification from the passport agency
- Follow their specific instructions for submitting a new photo
- You won’t need to reapply or pay additional fees—just submit a new photo
Capturing a compliant passport photo for your baby doesn’t have to be a stressful experience. By following the official requirements, avoiding common mistakes, and using our DIY guide, you can create a photo that meets all the necessary regulations. Remember to take your time, be patient, and take plenty of photos—you only need one great shot!
Need a compliant passport photo for your baby without the hassle? Try iPassportPhoto for a quick and easy solution. We’ll help you get a photo that meets all the requirements, guaranteed.


